With the release of WordPress 6.7, the platform continues to evolve, delivering new features and enhancements aimed at improving performance, usability, and accessibility. This update brings exciting tools for developers and site administrators alike, including:
- Enhanced Site Editor Features: More control over block settings and templates.
- Performance Upgrades: Faster loading times thanks to optimized scripts and assets.
- Design Improvements: Refined UI elements for a seamless user experience.
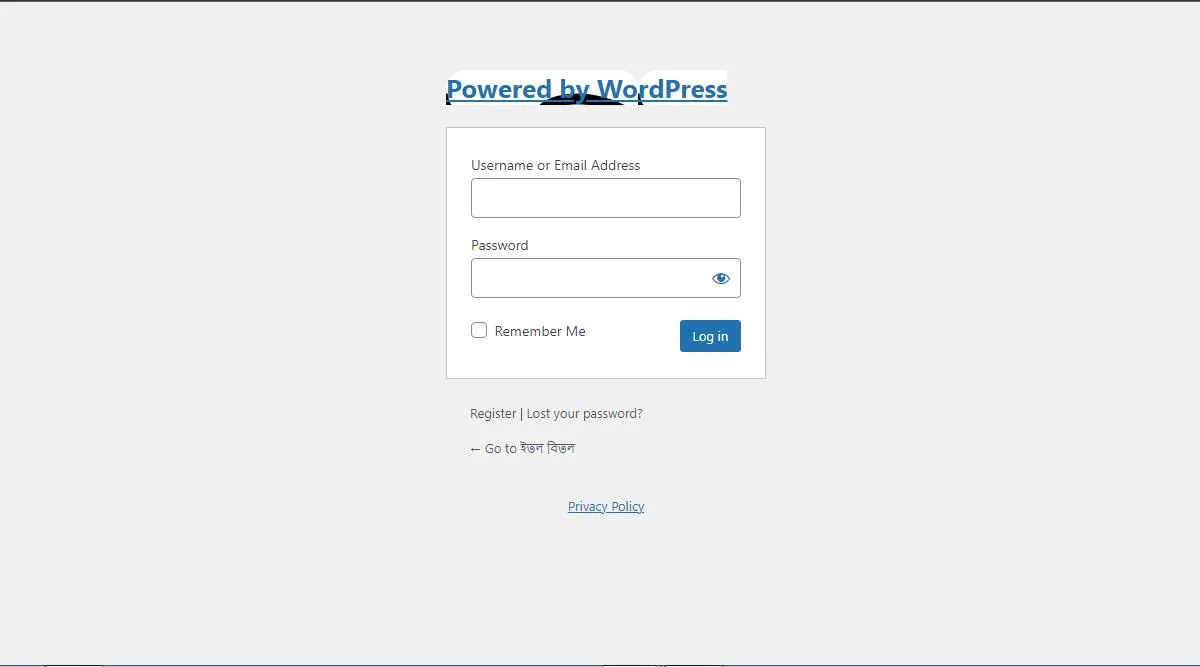
However, as with any major update, changes can sometimes lead to unexpected issues. One is the login logo issue, where custom logos either appear broken or are overlapped by text after the update.
In this tutorial, we’ll walk you through why this happens and, more importantly, how to fix it.
Why WordPress Login Logo Breaks After Updating to 6.7
After updating to WordPress 6.7, many users who hide the default WordPress login page observed issues with their custom login logos. This happens because of a subtle but significant change in the HTML structure of the login page when using a custom login page.
Here’s the difference:
- Default Login Page:
<h1 role="presentation" class="wp-login-logo"><a href="https://thoughtmight.com">Powered by WordPress</a></h1>
In this setup, theclass="wp-login-logo"is applied, ensuring that the logo is styled correctly with the defaultlogin.min.css. - Custom Login Page:
<h1><a href="https://thoughtmight.com">Powered by WordPress</a></h1>
Here, theclass="wp-login-logo"is missing. As a result, the necessary styles for the logo are not applied, leading to broken or misaligned logos.
How to Fix the WordPress Login Logo Issue in 6.7
If your custom login page logo breaks after updating to WordPress 6.7, don’t worry—it’s an easy fix! Here’s how you can do it:
Step 1: Open Your Theme’s functions.php File
To begin, access your WordPress theme’s functions.php file. You can do this through:
- The WordPress dashboard (
Appearance > Theme File Editor), or - FTP/SFTP or your hosting file manager for direct file editing.
Step 2: Add or Replace the Login Logo Code
If you have previously added custom code to change the login logo, replace it with the following code. If not, simply paste this code into your functions.php file:
function custom_loginlogo() {
	echo '<style type="text/css">
	#login h1 a{
		background: center / contain no-repeat url(/wp-content/uploads/YOUR_LOGO_PATH);
		display: block;
		color: transparent;
		width: 100px; /* Use your logo width */
		margin: 0 auto;
	}
	</style>';
}
add_action('login_head', 'custom_loginlogo');
add_filter( 'login_headerurl', function () {  return home_url(); } );
Don’t forget to replace the logo url and logo width.
Step 3: Save and Test
Save the changes to your functions.php file. Log out of WordPress and visit your custom login page.
Let me know if the code works for you or not.


